What’s the Deal with Snap Map?

snap map image

Snapchat recently released a new feature called Snap Map. It was immediately met with a flurry of negative feedback and concerns for user privacy and safety. As with any technology, device, platform, or service, new features can have an unexpected impact on user safety and privacy. The following is our assessment of potential privacy issues and possibilities for misuse within Snap Map.

The Snap Map feature allows users to share their location with other friends on Snapchat and to share Snaps on a map. The ability for others to see your location can definitely sound a little creepy, particularly if you’re concerned about your privacy. While there are a few things to consider and be aware of to protect your privacy, there are also a few features that make us a little less worried about Snap Map.

1.     The user controls the feature, and therefore controls their privacy.
Snap Map is an opt-in feature, not an opt-out feature; meaning it is off by default until a user chooses to turn it on. Opt-in by default is an important safety feature, but it is noteworthy that a person with access to the account could still turn on location sharing without the account owner’s knowledge. Because of this, it’s important that users know how to find the location sharing setting so that they can check to see if someone has turned it on without their permission.

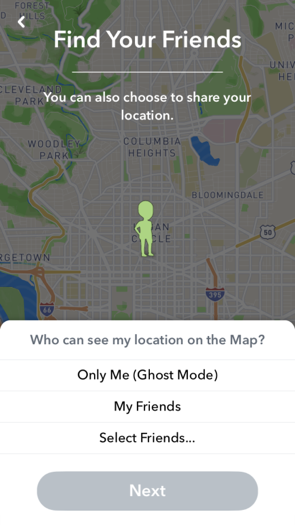
2.     Users also control the audience, even if the feature is on.
If you choose to use Snap Map, you can keep it in Ghost Mode. Ghost Mode means that your location isn’t shared with anyone at all, but that you are able to see yourself on the map. You can also choose between sharing your location with all of your friends, or with just a few select friends. Ghost Mode is the default setting when you have opted into using the Snap Map feature, that way you don’t share your location with anyone unless you choose to, even if you open the feature to check it out. If you decide to no longer share your location, even with a few selected friends, you last location is removed from the map.

3.     Submitted Snaps don’t show username, but images can still be identifying.
You can submit a Snap to “Our Story” to be shared on the Snap Map, although not all submitted Snaps are accepted to be on the Snap Map. Ones that are accepted do not show the username of the person who submitted it, but it will show up on the Snap Map at or near your location. Certain information in the Snap could make it more identifying (signs or landmarks can identify exact location, and clothing or tattoos can identify a person, even if their face isn’t shown). Also, users should be aware that Snaps submitted to “Our Story” may show on Snap Map regardless of their chosen location setting. This is important to consider, especially if other people are in your Snaps and you don’t have their permission to share.

4.     Notifications for the win!
We are always fans of user notifications when there is a feature that could be a potential safety and privacy risk. Snapchat will send reminders if location sharing has been left on for a period of time; making sure that users know their location is being shared. These notifications can also greatly decrease the chance that someone could turn on someone else’s Snap Map without their knowledge.

5.     When you’re sharing, you’re always sharing.
It’s really important to understand that once you opt-in and choose an audience to share your location with, that audience will continually be able to see your updated location every time you open the app, whether or not you are engaging with them or sending anyone a Snap. This might be the biggest concern, since if people don’t clearly understand this they may inadvertently share their location without realizing it.

Overall, Snap Map definitely makes it easier for people to share—and to receive—information about another person’s location. As with similar features on other platforms, users should be cautious and make informed, thoughtful decisions on how to protect their privacy; including if, when, and how they use it. It’s also really important to consider the privacy of others. You might not know what could be a safety or privacy risk for each of your friends, so you should never share images, videos, or location information about others without their consent. The good news is that this feature does have some built-in privacy options and gives users control over what is shared. Learn more about manage your location settings in Snap Map and check out SnapChat’s Approach to Privacy

10 Easy Steps to Maximize Privacy

Photo source: Ruth Suehle for opensourceway.com via flickr.com/ photo cropped from original

Photo source: Ruth Suehle for opensourceway.com via flickr.com/ photo cropped from original

We live in a world of constant technology use and lots of sharing. Technology has made it easier for families, friends, co-workers, and long-lost classmates to connect, and our online lives are just as important to us as our offline ones. But what you share doesn’t always stay within those circles and can be shared much more broadly than expected. Sometimes our technology gets out of our control.

So what can you do? Here are some quick ways to ensure that your tech use and sharing is done a little bit more safely. Although these may sound simple, these are some of the easiest things to forget to do and some of the easiest ways to lose control and privacy. 

1.    Log out of accounts and apps
Yeah, this is kind of duh advice, but you’d be surprised at how many people forget to log out of their accounts. They only realize they forgot when someone else posts something outrageous on their Timeline or feed. Logging out of your account is even more important if you’re using someone else’s device. Uncheck the “keep me logged in” feature and don’t allow the web browser to remember your password to automatically log you in. Doing so will make it easy for anyone to pick up your computer, tablet or smartphone, and post away, pretending to be you. 

2.    Use strong passwords
Use passwords to prevent strangers, parents (if you have nosy parents), and children (if you have nosy children) from accessing your accounts. Don't use the same password for more than one account, a password that someone who knows you can easily guess, or a one-word password that can be easily cracked. Create a password system so that you use unique passwords only you will know. 

3.    Review privacy settings
Review the privacy settings on all your online accounts, particularly your social media ones. Most sites allow users to limit what others see, whether it’s status updates or profile information. Don’t forget that it’s more than just social networks like Facebook or Twitter that have privacy settings. Most online accounts, such as Amazon, allow you to limit who can see your profile information. 

4.    Minimize location sharing
Smart phones have GPS location capability and you could be sharing your location without even knowing it. You can control which app has access to your location by turning off that option through your smart phone. (Most phones have location privacy options in the settings.) Some social network sites also allow you to manage your location privacy through the site’s privacy settings. 

5.    Don’t include location coordinates in your pictures
Did you know that when you take a picture on your smart phone, you could inadvertently share your location as well? That means that the selfie you just posted and uploaded online could contain your exact GPS coordinates. You can turn off that capability through the privacy setting on your camera app. Don’t forget that even if you turned off the location option for your camera app, the photo sharing app that you’re using may share your location—so turn off the location option for the app as well. 

6.    Be thoughtful about connecting social media accounts
Yeah, you can connect your Instagram to your Facebook or your Foursquare account to other social networks—and yeah, that may make it easier to update them all with just one click. But that also means that a lot more people will have access to lots of info about you. It also makes it more difficult to lock down your privacy. So be thoughtful about which social media accounts you connect. 

7.    Be careful when using free wireless networks
Free internet is always awesome. But you pay for it by being more vulnerable to risks. Using open wireless networks at your local coffee shop or sandwich shop can leave you susceptible to hackers accessing your private information. If you’re going to check bank accounts, buy something where you have to give your credit card information, or do anything sensitive, wait until you are back on a secure network. And if your personal wireless network doesn’t have a password on it, for the love of any deity, put a password on it!

8.    Use HTTPS everywhere
Not all websites are created equal. Some sites are more vulnerable to viruses, which makes your computer/tablet more vulnerable. However, some sites have a secure version – you can tell by looking at the link in the URL address bar. If it starts with https, it’s a secure page vs. http, which is just a normal page. (The next time you’re checking your bank account or buying something online, check out the address bar; it'll probably be green.) The easiest way to ensure that you’re using the secure page whenever you can is to download the HTTPS-everywhere browser add-in. Each time you go to a site, it’ll try to open the secure (https) site rather than the normal one. If the site doesn’t have a secure page, it’ll default to the normal page. 

9.    Use Incognito, Private Browsing, or InPrivate Browsing
Currently, Google Chrome, Mozilla Firefox, and Microsoft Explorer allow you to browse privately. Basically, privately browsing means that someone can’t open your web browser after you’ve used it and go through the history to see what you’ve been up to. Browsing privately is safer if you’re using a friend’s computer or tablet or are on a public computer. Keep in mind though that you have to close the browser to erase your history. If you leave it open, users after you can still see your browsing history.

10.    Use more than one email address
Email addresses are free, so have as many as you want! You can use one specific email address with a super strong password for your banking and shopping. Use another email for all the junk mail and accounts you have to create in order to use a particular web service. You could even consider using different email addresses for different social media accounts. Using different emails for different accounts is safer because if someone guesses one of your email + password combo, they don’t have access to all your accounts. You can even go one step further and download a service that “masks” your account address, so that you’re never using your actual email address.